Testing HTTP Status: 206 Partial Content and Range Requests

Posted by Unknown Senin, 26 November 2012 0 komentar
http://www.cyberciti.biz/cloud-computing/http-status-code-206-commad-line-test


The HTTP 2xx class of status codes indicates the action requested by the client was received, and processed successfully. HTTP/1.1 200 OK is the standard response for successful HTTP requests. When you type www.cyberciti.biz in the browser you will get this status code. The HTTP/1.1 206 status code allows the client to grab only part of the resource by sending a range header. This is useful for:
  1. Understanding http headers and protocol.
  2. Troubleshooting network problems.
  3. Troubleshooting large download problems.
  4. Troubleshooting CDN and origin HTTP server problems.
  5. Test resuming interrupted downloads using tools like lftp or wget or telnet.
  6. Test and split a large file size into multiple simultaneous streams i.e. download a large file in parts.

Finding out if HTTP 206 is supported or not by the remote server

You need to find file size and whether remote server support HTTP 206 requests or not. Use the curl command to see HTTP header for any resources. Type the following curl command and send a HEAD request for the url:
$ curl -I http://s0.cyberciti.org/images/misc/static/2012/11/ifdata-welcome-0.png
Sample outputs:
HTTP/1.0 200 OK
Content-Type: image/png
Content-Length: 36907
Connection: keep-alive
Server: nginx
Date: Wed, 07 Nov 2012 00:44:47 GMT
X-Whom: l3-com-cyber
Cache-Control: public, max-age=432000000
Expires: Fri, 17 Jul 2026 00:44:46 GMT
Accept-Ranges: bytes
ETag: "278099835"
Last-Modified: Mon, 05 Nov 2012 23:06:34 GMT
Age: 298127
The following two headers gives out information about this image file:
  1. Accept-Ranges: bytes - The Accept-Ranges header indicate that the server accept range requests for a resource. The unit used by the remote web servers is in bytes. This header tell us that either server support download resume or downloading files in smaller parts simultaneously so that download manager applications can speed up download for you. The Accept-Ranges: none response header indicate that the download is not resumable.
  2. Content-Length: 36907 - The Content-Length header indicates the size of the entity-body i.e. the size of the actual image file is 36907 bytes (37K).

How do I pass a range header to the url?

Now, you know you can make a range request to the url. You need to send GET request including a range header:
 
Range: bytes=0-1024
 
The exact sequence should be as follows. First, send HTTP/1.1 GET request:
 
GET /images/misc/static/2012/11/ifdata-welcome-0.png HTTP/1.1
 
Next, send the Host request-header to specifies the Internet host and port number of the resource being requested, as obtained from the original URI given by the user or referring resource:
 
Host: s0.cyberciti.org
 
Finally, send Range header request that specifies the range of bytes you want:
 
Range: bytes=0-1024
 

telnet command example

The telnet command allow you to communicate with a remote computer/server that is using the Telnet protocol. All Unix like operating systems including MS-Windows versions include Telnet Client. To start Telnet Client and to enter the Telnet prompt, run:
 
telnet your-server-name-here www
telnet your-server-name-here 80
 
To connect to remote server s0.cyberciti.org through port number 80, type:
 
telnet s0.cyberciti.org 80
 
Sample outputs:
Trying 54.240.168.194...
Connected to d2m4hyssawyie7.cloudfront.net.
Escape character is '^]'.
In this example, make range requests (0-1024 bytes) with s0.cyberciti.org to grab /images/misc/static/2012/11/ifdata-welcome-0.png, type:
GET /images/misc/static/2012/11/ifdata-welcome-0.png HTTP/1.1
Host: s0.cyberciti.org
Range: bytes=0-1024
Sample outputs:
Fig.01: Telnet command Range-requests bytes header example  (HTTP 206)
Fig.01: Telnet command Range-requests bytes header example (HTTP 206)
Where,
  1. Output section #1 - GET request.
  2. Output section #2 - HTTP Status: 206 partial content and range requests header response.
  3. Output section #3 - Binary data.

curl command

The curl command is a tool to transfer data from or to a server. It support HTTP/FTPSFTP/FILE retrieval using a byte range i.e a partial document from a HTTP/1.1, FTP or SFTP server or a local FILE. Ranges can be specified in a number of ways. In this example, retrieve ifdata-welcome-0.png using two ranges and assemble it locally using standard Unix commands:
 
curl --header "Range: bytes=0-20000" http://s0.cyberciti.org/images/misc/static/2012/11/ifdata-welcome-0.png -o part1
curl --header "Range: bytes=20001-36907" http://s0.cyberciti.org/images/misc/static/2012/11/ifdata-welcome-0.png -o part2
cat part1 part2 >> test1.png
gnome-open test1.png
 
Or use the -r option (pass -v option to see headers):
 
curl -r 0-20000 http://s0.cyberciti.org/images/misc/static/2012/11/ifdata-welcome-0.png -o part1
curl -r 20001-36907 http://s0.cyberciti.org/images/misc/static/2012/11/ifdata-welcome-0.png -o part2
cat part1 part2 >> test2.png
gnome-open test2.png
 

How do I enable Accept-Ranges header?

Most web server supports the Byte-Range request out of the box. Apache 2.x user try mod_headers in httpd.conf:
Header set Accept-Ranges bytes
Lighttpd user try the following configuration in lighttpd.conf:
 
## enabled for all file types ##
server.range-requests = "enable"
## But, disable it for pdf files ##
$HTTP["url"] =~ "\.pdf$" {
server.range-requests = "disable"
}
 

Not a fan of command line interfaces?

You can view HTTP headers of a page and while browsing. Try the following add-ons:

Conclusion

This post explained, how to find out HTTP headers and a response status. You can use 206 HTTP status code to grab a large file in parts. If the offset is valid, the server will return an HTTP 206 status code. If the offset is invalid, the request will return an HTTP 416 status code (Requested Range Not Satisfiable).

Recommend readings


Baca Selengkapnya ....

Top Open Source Learning Management Systems

Posted by Unknown Kamis, 22 November 2012 1 komentar
http://linux-news.org/index.php/2012/11/21/top-open-source-learning-management-systems


Open source Learning Management Systems have become extremely popular in recent years, but what does open source mean? Open Source technology is technology where the source code is “open”, that is, the code is available to the public and free to be modified. Improvements can be made by developers and it can be spread or sold to the wider community. So, why should an organization choose an open source Learning Management System as opposed to a homegrown or proprietary Learning Management System?
 

  • Firstly, if a company uses a proprietary Learning Management System, they must rely on the provider to maintain and service the Learning Management System, as well as provide support when problems occur.
  • As the code is widely available in open source Learning Management Systems, many developers read and examine the code, resulting in bugs being identified and fixed much faster than proprietary programs.
  • Open Source technology is very beneficial to schools, universities and other educational institutions as well as corporations.
  • Open Source Learning Management Systems are fully flexible and customizable, so they can be designed in line with your school/organization brand image.
  • There are no license or hardware costs associated with open source technology so it is free to start using it and carries minimal risk.

Open Source Learning Management Systems can also be converted to social learning platforms. You can create an online community through your Learning Management System. For example your learners can chat, blog, connect to social network sites (facebook etc.) and have polls on your open source Learning Management System. This blog post details how you can combine Google + with you Learning Management System.
Top 6 Open Source Learning Management Systems
With the huge number of Learning Management systems available today, making the decision on which platform to choose can be quite overwhelming. Below I have written brief explanations on 6 of the best systems currently available.
Moodle
Moodle is an abbreviation for “Modular Object-Oriented Dynamic Learning Environment” although when it was first developed the M stood for Martin’s after its developer, Martin Dougiamas. Moodle has been around for over ten years, with the first version in August 2002.
Features:

  • Very, very easy for first time users.
  • Easy generation of PDF documents.
  • Quick establishment of courses.
  • All grades for assignments and quizzes etc. can be viewed on one sheet and downloaded as a spreadsheet.
  • Teachers/Instructors can add multiple files very easily by dragging and dropping.

.LRN
.LRN (dot learn) was originally developed at MIT and is used by almost 500,000 people in educational institutions, corporations and government in over 18 countries.
Features:

  • Homework drop box.
  • Scorm Display
  • Student tracking data can be exported
  • Different roles are supported for.LRN Classes, such as students, professors and administrative staff
  • LRN has been internationalized to support multiple languages, dialects and timezones

However, it’s main flaw is that it has a very diverse interface with many inconsistencies.
eFront
The basic version of eFront is exactly that, basic, but this can be amplified with modules downloadable from the eFront site. The thought process behind this decision was so that users spend time learning new skills, not learning how to use the platform. There are two efront Learning Management platforms, an educational edition and an enterprise edition. The enterprise edition was aimed at medium sized enterprises with between 100 and 10,000 employees. Extensive research on organizations of this size was conducted before development began.
Features:

  • Visually attractive interface
  • Very fast and modern as it is Ajax enabled
  • Unicode, LDAP and SCORM supporting
  • Multilingual
  • Advanced security characteristics

Dokeos
This particular Learning Management System is available in three versions, the original free open source version, a pro version and a specific medical version. It is possible to build visual learning without graphical expertise.
Features:

  • Convert Office documents into Learning Paths
  • Content authoring tools
  • Video conferencing tools
  • Synchronization with HR Management systems
  • Print Certificates

Sakai
Sakai was designed by universities, for universities. It was built by MIT, Stanford and Berkeley amongst others so they did not need to use homegrown systems or pay vendors. It aims to be very well suited to group projects and describes itself as a Collaborative Learning Environment (CLE).
Features:

  • Site roster
  • View site usage statistics
  • Display external web pages
  • Create new Sakai sites from templates with pre-loaded tools
  • Contains tools for portfolio based activities

Because Sakai is mainly coded in Java it can cause problems, especially if using older versions of browsers. It can also be difficult to find programmers with Java skills.
ATutor
ATutor differs slightly from the other systems as it is actually a Learning Content Management System (LCMS). The A stands for accessible, and accessibility is its best feature. Also, user navigational patterns can be tracked so instructors can see students use of the site and students can track their own use.
Features:

  • Print Compiler to print notes or transcripts of discussions
  • SCORM and IMS packages can be imported
  • Easy course creation (although difficult with different types of content)
  • Easily accessible and adaptable
  • The file storage feature has a version control feature to keep track of changes and drafts

A negative aspect of this particular platform is that the Java Runtime Environment must be installed on the client side for SCORM tracking. Also, course elements can’t be bookmarked.
Conclusion
To conclude, of the six Learning Management Systems listed above, Moodle is by far the most popular, and in our opinion, the best. It has over 62 million users worldwide. On top of the features listed above, here are some other reasons we believe Moodle should be your number one choice for an open source Learning Management System.
Repositories - With Moodle it is very easy to import files from Flickr, Google Docs, Dropbox, Youtube etc. These files can all be saved together in one location for ease of access later.
Discussion boards - The Moodle Community is full of discussion boards in many different languages, therefore users can communicate with people from outside your organization as well as your employees.

Support - There are a plethora of support options for Moodle users. On the Moodle site you can find books and manuals, documents including frequently asked questions, and a forum where you can ask questions. The forums usually have plenty of other users and even computer programmers who are happy to offer help, advice and recommendations, whatever the issue.

Baca Selengkapnya ....

3 Open Source School Management Software for Teachers and Students

Posted by Unknown 0 komentar
http://linuxaria.com/article/open-source-school-management-software-for-teachers-and-students?lang=en


Around 1 month ago Jason posted an article related to Educational software that run on Linux (or even Linux distributions done with that goal), today he return on that topic with another roundup of software useful for schools.
Many educators might have been hesitant in the past regarding embracing open source software. But not any more as the number that has taken to open source software (OSS) has increased significantly over the years. As more teachers as well as institutions are now engaging with organizations such as Open Source Schools, SchoolForge among others. Consequently, these educators have begun to realize the potential inherent in OSS that can help transform education in many ways.
Now here is a list of open-source applications that is available to assist educators in teaching as well as in inspiring their students:


Opensis

openSIS otherwise known as “Open Source Student Information System” is a school administration application. And, it claims to reduce ownership cost for a school district by as much as 75% when compared with commercial systems of the same capability.
This application includes
  • attendance: By period, by day, with comments and all accomplished with a only a few clicks. Customize attendance codes to meet your specific needs. Easily check attendance by using the built-in reports.
  • contact information: Easily add contact information for parents, relatives and authorized individuals. Designate legal guardian, bus stops and associate parents with students enabling automatic access to the openSIS parent portal.
  • student demographics : openSIS enables the tracking of numerous student demographic attributes in a permanent record and across enrollments. Need something not included in the base installation? Use the custom categories and fields that allow you to easily create any number of custom fields to capture any specific data needs.
  • gradebook: The built in grade book allows teachers to enter homework assignments, class tests and any other activity using weighted scales if desired. Automatic tallying of grades, reports to find erroneously entered grades and advanced ad hoc reporting is included.
  • scheduling: openSIS includes a scheduler that allows you to easily input student requests and mass schedule students. You can make multiple schedule runs as you make adjustments and have multiple schedules within a school. View and print student schedules and class rosters with just a few clicks.
  • health records: Nurses visits, immunizations, physician contact information, allergies and more are all a part of the health records.
  • report cards: Easily input final grades, create student report cards and calculate GPA’s and class rankings.
The solutions is a 100% web-based application and has polished looks, a great deal of required functionality and appears to be easy to use based on the online demo website. openSIS is developed and maintained by Open Solutions for Education.
openSIS is written in the PHP programming language and uses the MySQL database system to store information. The community edition is released under the terms of the GNU General Public License, is free software and can be downloaded from the Sourceforge website.
opensis

Epoptes

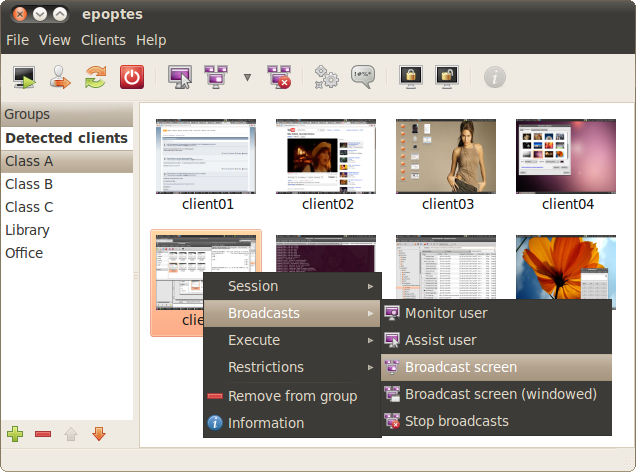
Epoptes (Επόπτης  - a Greek word for overseer) is an open source computer lab management and monitoring tool. It allows for screen broadcasting and monitoring, remote command execution, message sending, imposing restrictions like screen locking or sound muting the clients and much more!
It can be installed in UbuntuDebian and openSUSE based labs that may contain any combination of the following: LTSP servers, thin and fatclients, non LTSP servers, standalone workstations, NX or XDMCP clients etc.
It’s a partial rewrite of an older application called sch-scripts, which has been successfully used the last year in about 250 Greek schools. Epoptes already has a lot of features, but a lot more are planned, and it’s being developed at a very fast pace. It’s maintained by IT teachers and students, so it should be around for a long time!
epoptes

Fedena

Fedena is a free & opensource school management software that has more features than a student information system. Use fedena to efficiently manage students, teachers, employees, courses & all the system & process related to your institution.
Fedena gives you complete control over how you want to manage your school’s databases and provides many tools to organize its activities. It is a complete SIS plus with all the advantages of a perfect school ERP. With fedena there is no need of any extra hardware or technical maintenance staff. All you need is a computer with internet connection. You can operate fedena even with a mobile phone.
The official website claims that anyone with basic knowledge in computers will be able to use Fedena on first login without any instructions, but if you want support there is also a commercial site at www.fedena.com that can help you in the setup of the product.
Fedena is used by the Education Department of Government of Kerala to automate the system and process of over 15,000 schools in the state and is named as Sampoorna
Fedena is developed on the powerful Ruby on Rails framework and a demo is available at this url


Conclusion

The benefits of making use of open source software or application can be said to be as follows: One it helps save money, which can now be used for other important things. Secondly, it gives educators several more options. Since there are so many applications that can help with teaching different subjects as well as with school administration as a whole.

Baca Selengkapnya ....

Setting limits with ulimit

Posted by Unknown Selasa, 20 November 2012 0 komentar
http://www.itworld.com/operating-systems/317369/setting-limits-ulimit?page=0,0


Administering Unix servers can be a challenge, especially when the systems you manage are heavily used and performance problems reduce availability. Fortunately, you can put limits on certain resources to help ensure that the most important processes on your servers can keep running and competing processes don't consume far more resources than is good for the overall system. The ulimit command can keep disaster at bay, but you need to anticipate where limits will make sense and where they will cause problems.
It may not happen all that often, but a single user who starts too many processes can make a system unusable for everyone else. A fork bomb -- a denial of service attack in which a process continually replicates itself until available resources are depleted -- is a worst case of this. However, even friendly users can use more resources than is good for a system -- often without intending to. At the same time, legitimate processes can sometimes fail when they are run against limits that are designed for average users. In this case, you need to make sure that these processes get beefed up allocations of system resources that will allow them to run properly without making the same resources available for everyone.
To see the limits associate with your login, use the command ulimit -a. If you're using a regular user account, you will likely see something like this:
$ ulimit -a
core file size (blocks, -c) 0
data seg size (kbytes, -d) unlimited
scheduling priority (-e) 0
file size (blocks, -f) unlimited
pending signals (-i) 32767
max locked memory (kbytes, -l) 32
max memory size (kbytes, -m) unlimited
open files (-n) 1024
pipe size (512 bytes, -p) 8
POSIX message queues (bytes, -q) 819200
real-time priority (-r) 0
stack size (kbytes, -s) 10240
cpu time (seconds, -t) unlimited
max user processes (-u) 50
virtual memory (kbytes, -v) unlimited
file locks (-x) unlimited
One thing you might notice right off the bat is that you can't create core dumps -- because your max core file size is 0. Yes, that means nothing, no data, no core dump. If a process that you are running aborts, no core file is going to be dropped into your home directory. As long as the core file size is set to zero, core dumps are not allowed.


  This makes sense for most users since they probably wouldn't do anything more with a core dump other than erase it, but if you need a core dump to debug problems you are running into with an application, you might want to set your core file size to unlimited -- and maybe you can.
$ ulimit -c ulimited
$ ulimit -c
unlimited
If you are managing a server and want to turn on the ability to generate core dumps for all of your users -- perhaps they're developers are really need to be able to analyze these core dumps, you have to switch user to root and edit your /etc/security/limits.conf (Linux) or make changes in your /etc/system (Solaris) file.
If, on the other hand, you are managing a server and don't want any of your users able to generate core dumps regardless of how much they'd like to sink their teeth into one, you can set a limit of 0 in your limits.conf.
Another limit that is often enforced is one that limits the number of processes that an individual can run. The ulimit option used for this is -u. You can look at your limit as we did above with the ulimit -a command or show just the "nproc" limit with the command ulimit -u.
$ ulimit -u
50
Once again, your users can change their limits with another ulimit command -- ulimit -u 100 -- unless, of course, they can't. If you have limited them to 50 processes in the limits.conf or system file, they will get an error like this when they try to increase their limits:
$ ulimit -u 100
-bash: ulimit: max user processes: cannot modify limit: Operation not permitted
Limits can also be set up by group so that you can, say, give developers the ability to run more processes than managers. Lines like these in your limits.conf file would do that:
@managers          hard    nproc           50
@developers hard nproc 200
If you want to limit the number of open files, you just use a different setting.
@managers          hard    nofile         2048
@developers hard nofile 8192
sbob hard nofile 8192
Here we've given two groups and one individual increases in their open files limits. These all set hard limits. If you set soft limits as well, the users will get warnings when they reach the lower limit.
@developers        soft    nofile         2048
@developers hard nofile 8192
To see a list of the ulimit options, look at the man page (man ulimit).


  You will note that ulimit is a bash built-in -- at least on Linux -- and that the following options are available:
-a     All current limits are reported
-c The maximum size of core files created
-d The maximum size of a process's data segment
-e The maximum scheduling priority ("nice")
-f The maximum size of files written by the shell and its
children
-i The maximum number of pending signals
-l The maximum size that may be locked into memory
-m The maximum resident set size (has no effect on Linux)
-n The maximum number of open file descriptors (most systems
do not allow this value to be set)
-p The pipe size in 512-byte blocks (this may not be set)
-q The maximum number of bytes in POSIX message queues
-r The maximum real-time scheduling priority
-s The maximum stack size
-t The maximum amount of cpu time in seconds
-u The maximum number of processes available to a single
user
-v The maximum amount of virtual memory available to the
shell
If you limits.conf file permits, you might see limits like these set up for particular applications that really need the extra capacity. In this example, the oracle use is begin given the ability to run up to 16,384 processes and open 65,536 files. These lines would be set up in the oracle user's .bash_profile.
if [ $USER = "oracle" ]; then
if [ $SHELL = "/bin/ksh" ]; then
ulimit -p 16384
ulimit -n 65536
else
ulimit -u 16384 -n 65536
fi
fi
Setting limits can provide a defense against processes that go haywire and malicious processes that try to make your systems unusable. Just make sure that your limits work for you and not against you as you plan how your resources can best be allocated.


Baca Selengkapnya ....

How to Run 3D Android Games and Apps in Ubuntu [with full OpenGL acceleration]

Posted by Unknown 0 komentar
http://www.ubuntuvibes.com/2012/11/how-to-run-3d-android-games-and-apps-in.html


AndroVM is a pretty cool project that aims at providing a “as good as possible” support to run Android in Virtual environments.
Some of the features include full Google Play support, networking support with host OS, SD card storage etc. The latest builds of AndroVM are based on Jelly Bean.
A new version of AndroVM was released few days back with Hardware OpenGL and improved ARM support.

The default AndroVM software mode uses VirtualBox VGA driver while Hardware OpenGL mode uses a separate “AndroVM player” external application for display.
The amount of performance gain using Hardware OpenGL mode is huge and the UI responsiveness increases greatly.

I have tested around ten 3D games and a few of them didn't start. However, games that launched successfully ran at maximum speed with full OpenGL acceleration.
Below is a step by step guide to install AndroVM on Ubuntu (tested with Ubuntu 12.10).
Download both VirtualBox OVA file and AndroVMPlayer from here.
You can use the guide below to select appropriate OVA file:
  • vbox86p: Built for a “phone”, 480×800 default resolution
  • vbox86t: Built for a “tablet”, 1024×600 default resolution
  • vbox86tp: Built for a “tablet” with phone capabilities, 1024×600 default resolution
  • gapps: Google play support
  • houdini: ARM support
I would recommend downloading vbox86tp version with gapps & houdini.
Now, import the OVA file to VirtualBox. Launch Virtualbox preferences from menu and add a host only network as shown in screenshot below:
Launch settings window for newly imported OVA file and go to network tab. Select Host-only Adapter and vboxnet0 as shown in screenshot below:
Now, run the AndroVM OVA file in virtualbox and launch androVM settings app. Enable Hardware OpenGL and reboot.
This time, the image will fail to boot properly and you will get a message like this:
IP Management: 192.168.56.101

Leave this window open
Now extract the AndroVMPlayer archive you downloaded in first step and execute run.sh script with width, height and DPI as arguments. Example:
./run.sh 1024 600 160

If you followed the guide correctly, you should see Android running on your desktop with full OpenGL hardware acceleration. Below is a screenshot of 3D MMO 'Arcane Legends' running on Ubuntu:
Lastly, if you want to disable OpenGL hardware mode in AndroVM image, run the command below:
VBoxManage guestproperty set "androVM_vbox86tp_4.1.1_r4-20121106-gapps-houdini" hardware_opengl

Replace the part in quotes with the name of your AnroVM virtualbox image.

Baca Selengkapnya ....

Review: 6 slick open source routers

Posted by Unknown Minggu, 18 November 2012 0 komentar
http://www.infoworld.com/d/networking/review-6-slick-open-source-routers-206810


Hackers of the world, unite! You have nothing to lose but the lousy stock firmware your routers shipped with.
Apart from smartphones, routers and wireless base stations are undoubtedly the most widely hacked and user-modded consumer devices. In many cases the benefits are major and concrete: a broader palette of features, better routing functions, tighter security, and the ability to configure details not normally allowed by the stock firmware (such as antenna output power).
[ Also on InfoWorld: Teach your router new tricks with DD-WRT. | Get expert networking how-to advice from InfoWorld's Networking Deep Dive PDF special report and Technology: Networking newsletter. ]
The hard part is figuring out where to start. If you want to buy a router specifically to be modded, you might be best served by working backward. Start by looking at the available offerings, picking one of them based on the feature set, and selecting a suitable device from the hardware compatibility list for that offering.
In this piece we've rounded up five of the most common varieties of third-party operating systems, with emphasis on what they give you and who they're best for. Some of these are designed for embedded hardware or specific models of router only; some are designed as more hardware-agnostic solutions; and some are intended to serve as the backbone for x86-based appliances. To that end, we've presented them with the more embedded-oriented solutions first and the more generic-PC oriented solutions last.
DD-WRTDD-WRT is a popular router firmware choice not only with hobbyists and hackers, but router manufacturers as well. Buffalo, for instance, uses DD-WRT as the basis for many of its home and prosumer router offerings. The original product was created in 2005 for the Linksys WRT54G router, a device designed to accept Linux-based firmware, and the core software is available as a GPL offering. Note that there may be fairly major differences in implementation or presentation between the core version of DD-WRT and third-party, router-specific editions such as Buffalo's.
Supported hardware: DD-WRT supports Broadcom, ADM, Atheros, or Ralink chip sets, but be aware that not all devices using these chip sets are automatically compatible. Some may require unit-specific hackery to work; some may not work at all, period. The DD-WRT maintainers also keep a database of supported devices, along with a list in their wiki of both devices and features.
Features: DD-WRT provides a breadth of powerful features not normally found in consumer-grade routers, such as ChilliSpot (for creating commercial-grade Wi-Fi hotspots), the AnchorFree VPN system, and support for the NoCat wireless community network system. It also comes in a range of differently sized builds, from the 2MB "micro" build that supports only the most essential functions to the 8MB "mega" build that has, well, everything. This allows the firmware to be placed on devices of widely varying storage capacity.
Limitations: The core version of DD-WRT is updated very infrequently. If you want more frequent updates, you either must go with an interim beta or pick a manufacturer-supplied version with regular revisions.
Recommendation: DD-WRT is the best choice for most users. The fact that DD-WRT comes as a stock preload (albeit with mods) in many routers makes it easy to get your hands on a router with it both preloaded and tuned specifically to work with your hardware, as well as to keep it updated.
A commercial version of DD-WRT ships with many routers from Buffalo and other hardware makers. The unbranded version may vary in terms of presentation and feature set.


TomatoOriginally devised as a replacement firmware for Broadcom-based routers, Tomato drew attention for its GUI, bandwidth-monitoring tools, and other nifty professional-level and tweak-able features.
Supported hardware: Hardware support is much the same as with DD-WRT, although pay close attention to exactly which builds are compatible with the particular hardware you're using.
Features: Many of the functions found in Tomato are also found in DD-WRT, such as sophisticated QoS controls, CLI access via telnet or SSH, Dnsmasq, and so on. That said, Tomato has been designed such that few configuration changes require rebooting, though that's a common complaint about any grade of router firmware, whether commercial or open source. There's also been a wealth of custom scripting developed by the Tomato community, such as redirecting the router's syslog to disk or another computer, backing up router settings, and much more.
Tomato has seeded a vast crop -- pun intended -- of spin-offs and offshoots, which deserve at least as much attention as the core project itself. Chief among them is Tomato USB, so named because it provides support for routers that have USB ports, thus allowing the mounting of removable media. Toastman compiles useful mods from a number of other Tomato firmware versions, such as an improved QoS module and IP traffic client monitoring tools. Teaman (also known by its Google Code project name, "tomato-sdhc-vlan") adds support for SDHC (Secure Digital High Capacity)/MMC media storage, 802.11Q VLAN tagging, and the experimental MultiSSID Web interface.
This isn't an exhaustive list. There's also Tomato by Shibby, Tomato RAF, and many other spin-offs, each with their own quirks and feature modifications.
Limitations: The reason there are so many mods for Tomato is simple: The code for the original project hasn't been updated since 2010. To that end, any updates or new features come courtesy of the alternate builds described above. Updates for any one of these projects is also not guaranteed.
Also, because of the sheer number of Tomato forks, it can be difficult to pick the one that best fits your needs. Picking the right one for your hardware, though, shouldn't be too tough, thanks to the copious documentation of which devices fit which builds.
Recommendation: Tomato is best for moderately advanced users. Working with Tomato is on a par with dealing with DD-WRT, in terms of making sure you have the right hardware and following the flashing instructions to the letter. Tomato isn't used as a commercial pre-load, though, so don't expect to see it in an off-the-shelf router à la DD-WRT.
Tomato RAF is one of the many sub-breeds of the Tomato firmware. After development ceased on the original version, others have picked up the torch.


OpenWRTOpenWRT is a router firmware project that's like a full-blown Linux distribution for embedded systems. You can download the packages for a specific hardware configuration and build the code for that hardware using a supplied tool chain. This complicates the deployment process, but also provides enormous flexibility.
To save time, various prebuilt versions of OpenWRT are available for common hardware types and router platforms. This includes everything from generic x86-based systems to the Broadcom and Atheros chip sets used to power many open-firmware routers. The makers of OpenWRT recommend starting with an off-the-shelf version, then learning how to roll your own once you've found your footing.
Supported hardware: Lots. More than 50 hardware platforms and 10 CPU architectures are supported: everything from ARM mini-boards to full-blown x86-64 systems. They also have a buyer's guide for helping you choose proper hardware for your particular needs, in the event you're shopping for something specifically OpenWRT-compatible.
Features: In addition to broad hardware and platform support, OpenWRT includes support for the OLSR mesh networking protocol, which allows you to create mobile ad hoc networks out of multiple OpenWRT devices. Also, the software, once deployed, can be modified without reflashing the firmware. Packages can be added or removed as needed through a built-in package management system.
Various spin-offs of OpenWRT also exist, some with highly specific usage scenarios. The Cerowrt build, for instance, was created as part of the Bufferbloat project to address network bottlenecking issues in LANs and WANs. FreeWRT is even more developer-focused than the core OpenWRT builds, but has a handy Web-based image builder for those who want to create a FreeWRT firmware with a little guidance. And Gargoyle offers as one of its big features the ability to set bandwidth caps per host.
Limitations: The biggest strengths of OpenWRT are also its biggest limitations. It's best used by people who really, really know what they're doing. If you just want to replace your stock router firmware with something a little more current, steer clear.
Recommendation: OpenWRT is best suited for experts. This is the firmware for people who want as few limitations as possible on what they can do, are ambitious about using unusual hardware, and feel comfortable with the kind of tinkering that would normally go into rolling one's own personalized Linux distro.
Gargoyle is one of many breeds of OpenWRT, specifically offering special bandwidth-capping features. Like a miniature Linux distro, OpenWRT lends itself easily to this sort of respinning.


M0n0wall and PfSense
Among the other projects here, m0n0wall is closest in spirit to OpenWRT. It's a version of FreeBSD that works as a firewall or router, so it's much closer to a full-blown OS installation than a mere firmware layer.
Supported hardware: M0n0wall runs on embedded hardware systems with at least 64MB of RAM and 16MB of flash storage. It can also be run on commodity x86 PC hardware, and a high degree of compatibility is provided with common PC components thanks to the BSD driver library.
Features: All common router features are supported, including traffic-shaping and QoS tools, as well as features useful on high-end networks such as VLAN tagging and polling. Boot time is fast: 30 seconds tops to a full working system on flash-based hardware. Most useful is the sophisticated Web interface, which includes the ability to upgrade the firmware directly through a browser.
M0n0wall is also the basis for a number of spin-off builds. Most notable among them is PfSense, which is intended for full-blown PC-style systems rather than embedded hardware. If you plan to repurpose a PC as a router, start with pfsense instead of M0n0wall, as you'll have something built directly for PC hardware and you can keep the amount of tinkering to a minimum. Another version, M0n0wall-mod, adds new WAN options such as the ability to configure DHCP and PPTP over a separately enumerated WAN interface.
Limitations: One drawback of M0n0wall is its support for only a small number of wireless chip sets. That said, any 802.11 hardware based on the Atheros chip set should work.
Recommendation: Those repurposing old PC hardware as a firewall or router should check out pfsense. If you're looking to fashion an embedded hardware router into a multipurpose network device, M0n0wall is a good choice.
Based on FreeBSD, m0n0wall and spinoff pfsense (setup screen shown) are designed for both embedded hardware and full-blown x86 boxes.
Based on FreeBSD, M0n0wall and spin-off PfSense (setup screen shown) are designed for both embedded hardware and full-blown x86 boxes.


VyattaVyatta is a Linux-based network operating system available in both a core open source implementation and a commercial edition. The commercial edition can be had in the form of a software subscription or by purchasing a hardware appliance. Vyatta is commonly deployed as a small- or branch-office gateway, as a VPN concentrator, and as a bridge between data centers or between data centers and clouds.
Supported hardware: Like OpenWRT and M0n0wall/PfSense, Vyatta comes in incarnations that allow it to be used in stock 32-bit x86 PC hardware, so any such system can be transformed into a high-efficiency router, firewall, and network services box.
Features: You name it, Vyatta probably has it. Among the most recent additions as of the March 2012 build of the product are a GUI and dashboard that displays graphical statistics (in the commercial edition only), RFC-compliant VRRP, an enhanced connection tracking and logging subsystem, and stateful inspection firewall -- professional features all. Vyatta also comes built for drop-in use in many virtualization environments, with support for VMware vSphere 5 templates just added too.
Limitations: The single biggest limitation of Vyatta, vis-à-vis the other products in this roundup, is that it's designed entirely for x86 devices. And not just any old x86 device, either, but one with a fairly large amount of storage (1GB minimum), especially by embedded-device standards. In short, Vyatta is best for full-blown PCs. Also, while a 64-bit edition does exist, it's still considered experimental at this time and shouldn't be used for production systems.
Finally, a number of key features, including the Web interface, are only available in the commercial edition. The command-line interface is designed for network admins and may pose a hurdle to more casual users. A free 30-day trial of the commercial edition is available, though.
Recommendation: Vyatta is a business-oriented product with routing and security features beyond the needs of most small offices and home offices. That said, those building a network appliance using full-fledged x86-based PC hardware -- especially for larger environments -- will find everything they need in Vyatta.
Vyatta's Web-based configuration panel is one of the big assets for its commercial edition, but its open source core version preserves all the under-the-hood functionality for this x86-based network OS.

Baca Selengkapnya ....

Set Up DKIM (DomainKeys Identified Mail) Working With Postfix On CentOS Using OpenDKIM

Posted by Unknown 0 komentar
http://www.howtoforge.com/set-up-dkim-domainkeys-identified-mail-working-with-postfix-on-centos-using-opendkim


  This tutorial shows how to get DKIM working on a CentOS box running Postfix using OpenDKIM, I'll also cover some simple trouble shooting tips and advice for future upgrade on your OpenDKIM installation.


1 Requirements

This tutorial assumes that you have a full functional CentOS installation running the following services:
- Postfix 2.3.3 or better currently working.
- Sendmail is turned off.

2 Preliminary Notes

I'm running all the steps in this tutorial with root privileges, I'm currently running CentOS 6.3 with OpenDKIM version 2.4.2 and I will be using example.com as the primary domain for this tutorial.

3 Download and install OpenDKIM

You'll also need to install the OpenSSL and Sendmail development packages, because they contain some "libraries" you need to get OpenDKIM working.
yum install sendmail-devel openssl-devel
Download OpenDKIM to the /usr/local/src directory:
cd /usr/local/src
wget http://sourceforge.net/projects/opendkim/files/opendkim-2.4.2.tar.gz
Extract, configure, compile, and install OpenDKIM with:
tar zxvf opendkim-2.4.2.tar.gz
cd opendkim-2.4.2
./configure --sysconfdir=/etc --prefix=/usr/local --localstatedir=/var
make
make install
Note that the ./configure command includes a few very important flags, which will be passed into the startup script that's created when the configure command runs. The first tells the system where OpenDKIM's conf file will be located, the second sets the preferred prefix for some other important file locations, and the final one controls the directory where the PID file for OpenDKIM will be stored.

4 Create a new user

Add a new user for DKIM called opendkim with the following options:
useradd -r -g -s /sbin/nologin opendkim
This command will create a new system account (-r) and group (-g) called opendkim and assign no shell access to this user (-s).

5 Create working directories

Make some new directories for OpenDKIM and give them the proper ownership and permissions with:
mkdir -p /etc/opendkim/keys
chown -R opendkim:opendkim /etc/opendkim
chmod -R go-wrx /etc/opendkim/keys

6 Copy the startup script to /etc/init.d/

OpenDKIM's source package includes a contrib directory that contains a custom init script to be use with all RedHat-compatible systems, including Fedora and CentOS. You can copy it to your /etc/init.d/ directory to make starting, stopping, restarting, and reloading OpenDKIM easy:
cp /usr/local/src/opendkim-2.4.2/contrib/init/redhat/opendkim /etc/init.d/
Now set the correct permissions for the init script:
chmod 755 /etc/init.d/opendkim

7 Generate keys for signing

You need to generate a private and a public key for each of the domains for which you wish to sign mail. The private key is stored away on your server, while the public key gets published in your domain's DNS records so that receiving mail servers can verify your DKIM-signed mail.
You need decide now what the name of your selector is going to be. A selector is a unique keyword that is associated with both keys (public and private), included in all the signatures, and published in your DNS records. For simplicity, I use the word default as my default selector. Feel free to choose something different, but if you do, you'll need to use it consistently throughout your setup. Also, while this should go without saying, you should use your mail domain instead of example.com throughout the following steps.
Create your keys:
mkdir /etc/opendkim/keys/example.com
/usr/local/bin/opendkim-genkey -D /etc/opendkim/keys/example.com/ -d example.com -s default
chown -R opendkim:opendkim /etc/opendkim/keys/example.com
mv /etc/opendkim/keys/example.com/default.private /etc/opendkim/keys/example.com/default
In this example, I used the -D (directory) option, the -d (domain) option, and the -s (selector) options. That's all you need to get this going.

8 Edit configuration files

You need to create or edit four files:
- 1 /etc/opendkim.conf –- OpenDKIM's main configuration file
- 2 /etc/opendkim/KeyTable –- a list of keys available for signing
- 3 /etc/opendkim/SigningTable -- a list of domains and accounts allowed to sign
- 4 /etc/opendkim/TrustedHosts –- a list of servers to "trust" when signing or verifying
Create the file /etc/opendkim.conf:
vi /etc/opendkim.conf
Make sure your file that looks like this:
##
## opendkim.conf -- configuration file for OpenDKIM filter
##
AutoRestart Yes
AutoRestartRate 10/1h
Canonicalization relaxed/simple
ExternalIgnoreList refile:/etc/opendkim/TrustedHosts
InternalHosts refile:/etc/opendkim/TrustedHosts
KeyTable refile:/etc/opendkim/KeyTable
LogWhy Yes
Mode sv
PidFile /var/run/opendkim/opendkim.pid
SignatureAlgorithm rsa-sha256
SigningTable refile:/etc/opendkim/SigningTable
Socket inet:8891@localhost
Syslog Yes
SyslogSuccess Yes
TemporaryDirectory /var/tmp
UMask 022
UserID opendkim:opendkim
Create the file /etc/opendkim/KeyTable:
vi /etc/opendkim/KeyTable
Make sure your file that looks like this:
default._domainkey.example.com example.com:default:/etc/opendkim/keys/example.com/default
The KeyTable file tells OpenDKIM where to find your keys. Each entry in the KeyTable file is a single line for each key location (for example, all of the text in the above example should be on a single line in your file). If you're going to use multiple keys (to sign mail for virtual domains with different keys), you'll need to create a separate line in the KeyTable file for each domain.
Create the file /etc/opendkim/SigningTable:
vi /etc/opendkim/SigningTable
Make sure your file that looks like this:
*@example.com default._domainkey.example.com
The SigningTable file tells OpenDKIM how to use your keys, as in which senders should use which selectors for their signatures. In the above example, I'm saying that everyone (*) sending mail from the server "example.com" should use the selector named "default." It's important to note that the * wildcard symbol will only work if the SigningTable option uses the refile: prefix before the filename.
Create the file /etc/opendkim/TrustedHosts:
vi /etc/opendkim/TrustedHosts
Make sure your file that looks like this:
127.0.0.1
hostname1.example1.com
example1.com
hostname1.example2.com
example2.com
The TrustedHosts file tells OpenDKIM who to let use your keys. Because it's referenced by the ExternalIgnoreList directive in your conf file, OpenDKIM will ignore this list of hosts when verifying incoming mail and because it's also referenced by the InternalHosts directive, this same list of hosts will be considered "internal," and OpenDKIM will sign their outgoing mail.
IMPORTANT: Make sure you list the IP address for localhost (127.0.0.1) in the TrustedHosts file or OpenDKIM won't sign mail sent from this server. If you have multiple servers on the same network that relay mail through this server and you want to sign their mail as well, they must be listed in the TrustedHosts file. Put each entry on its own line. An entry can be a hostname, domain name (e.g. "example.com"), IP address, an IPv6 address (including an IPv4 mapped address), or a CIDR-style IP specification (e.g. "192.168.1.0/24?).


9 Edit your Postfix configuration

 
Add the following lines at the end of your Postfix main.cf file, which will make Postfix aware of OpenDKIM and allow it to sign and verify mail:
vi /etc/postfix/main.cf
smtpd_milters           = inet:127.0.0.1:8891
non_smtpd_milters = $smtpd_milters
milter_default_action = accept
milter_protocol = 2

10 Start OpenDKIM and restart Postfix

Assuming you're using bash, do:
hash -r
to rehash your shell so you can find the init script.
Now let's to stop sendmail from starting on CentOS:
chkconfig --del sendmail
Start OpenDKIM:
service opendkim start
You should get a message that says:
Starting OpenDKIM Milter: [ OK ]
However, if you get an error message such as:
Starting OpenDKIM Milter: opendkim: /etc/opendkim.conf: configuration error at line 5: unrecognized parameter
You probably just mistyped something in one of the config files. Go to the line number of the file listed, and check your work against the example(s) in this HowTo. Then try starting up OpenDKIM again.
Once it starts, restart Postfix with:
/etc/init.d/postfix restart
If everything looks good, let's run chkconfig on OpenDKIM to make sure it starts when you boot your server:
chkconfig --level 2345 opendkim on
If you get some errors, try some of these startup troubleshooting tips before moving on.

11 Startup troubleshooting tips

Tip 1: The best place to start troubleshooting any mail issues (including OpenDKIM) is to check your maillog file:
tail -f /var/log/maillog
while you're starting, stopping, and/or restarting OpenDKIM and Postfix. This allows you to see more details about any errors in your configuration.
Tip 2: To get the most verbose information from OpenDKIM, make sure the LogWhy option in your /etc/opendkim.conf file is uncommented and set to Yes. If your outgoing mail isn't getting signed and you want to know why, this should tell you.

12 Adding DNS Records

Now that your mail server is signing outgoing mail and verifying incoming mail, you'll need to put some information in your DNS records to tell other mail servers how your keys are set up, and provide the public key for them to check that your mail is properly signed.
cat /etc/opendkim/keys/example.com/default.txt
The output should look something like this:
default._domainkey IN TXT "v=DKIM1; g=*; k=rsa; p=7k45u5i2T1AlEBeurUbdKh7Nypq4lLMXC2FHhezK33BuYR+3L7jxVj7FATylhwIDAQABMIGfMA0GCSqGSIb3DQEBAQUAA4GNADCBiQKBgQDHY7Zl+n3SUldTYRUEU1BErHkKN0Ya52gazp1R7FA7vN5RddPxW/sO9JVRLiWg6iAE4hxBp42YKfxOwEnxPADbBuiELKZ2ddxo2aDFAb9U/lp4" ; ----- DKIM default for example.com
Now create a DNS record for your domain and paste the entire contents of the /etc/opendkim/keys/example.com/default.txt file at the bottom of your domain's zone file, the TXT Name would default._domainkey and the TXT Value would be everything inside the quotes (starting with v=). You can ignore the semi-colon and comments at the end.
Make sure you follow the instructions of your DNS provider for adding a new TXT Record to your domain.
Now might be a good time to ensure that you already have a valid SPF Record in place. Having both DKIM and SPF in place will increase your chances of having your outgoing mail successfully delivered.

13 Testing your setup

The best way to see that everything is working on the server side is to keep an eye on your /var/log/maillog file.
tail -f /var/log/maillog
When OpenDKIM starts (or restarts), you should see lines like:
opendkim[4397]: OpenDKIM Filter: mi_stop=1
opendkim[4397]: OpenDKIM Filter v2.4.2 terminating with status 0, errno = 0
opendkim[27444]: OpenDKIM Filter v2.4.2 starting (args: -x /etc/opendkim.conf)

When you send a mail that gets successfully signed, you should see:
opendkim[22254]: 53D0314803B: DKIM-Signature header added
The best way to check that your signed mail is being authenticated and that your DNS records are properly set up is to use one of the free testing services:
- Send a signed email to: autorespond+dkim@dk.elandsys.com
- Send a signed email to: check-auth@verifier.port25.com
Each of these services will return an email telling you if things are working properly, and give you some pointers on troubleshooting if needed.

14 Upgrading OpenDKIM

If you would like to upgrade to a newer version of OpenDKIM, simply download the updated version and follow the guide to compile and install OpenDKIM with these steps:
tar zxvf opendkim-2.4.2.tar.gz
cd opendkim-2.4.2
./configure --sysconfdir=/etc --prefix=/usr/local --localstatedir=/var
make
make install
This will upgrade your OpenDKIM and keep your existing configuration intact. Remember to restart OpenDKIM after your upgrade with:
/etc/init.d/opendkim restart
Then verify that the newer version started up with no problems:
tail -f /var/log/maillog

15 Links

DKIM.org -- The official site for DomainKeys Identified Mail.
OpenDKIM.org -- OpenDKIM Project Site.
OpenSPF.org -- A very good spam-fighting technique that you should be using if you're sending email.


Baca Selengkapnya ....
Trik SEO Terbaru support Online Shop Baju Wanita - Original design by Bamz | Copyright of android blackberry.